
About the Author
Thor, Electrical Engineer, Weishoelec
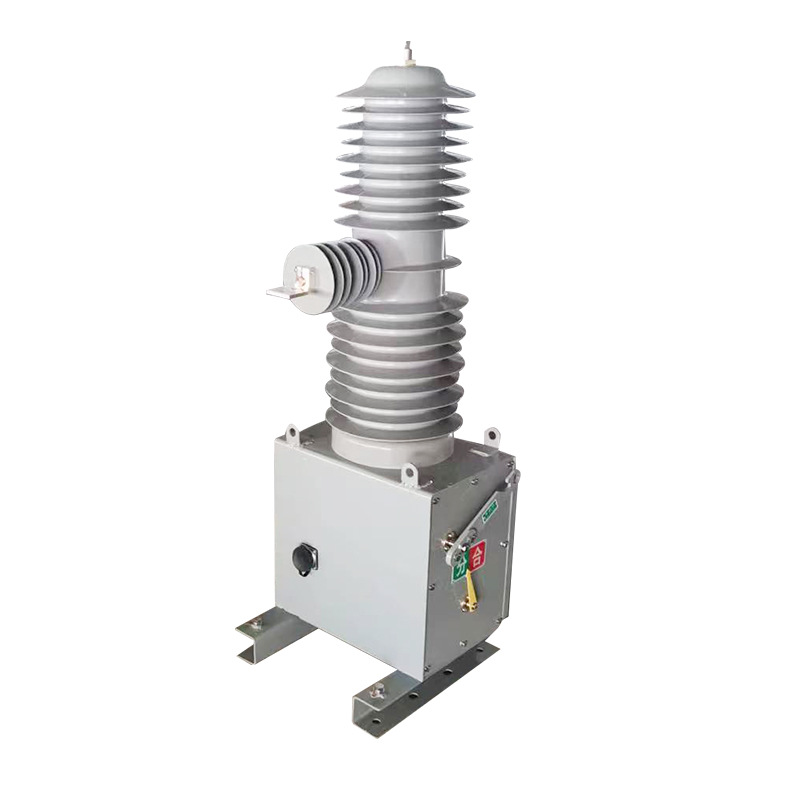
Capacitive Voltage Transformers (CVTs) are key parts of today's complex power grids. They not only measure voltage but also serve as coupling capacitors. These important devices can have faults due to design issues, manufacturing processes, raw materials, and environmental conditions. Common issues are failures in the capacitive divider and problems with the intermediate transformer.
Such malfunctions can lead to significant system instability. This guide shares 9 key "diagnostic secrets" for CVTs. These tips help power engineers find and fix defects early. This ensures safe and stable power system operation. Consider it your ultimate toolkit for becoming a "CVT Health Manager" in the power system!
A. Dielectric Loss Test (Self-Excitation Method)

Test Purpose
This test assesses the dielectric loss characteristics of the CVT's insulation. Its primary goal is to determine if the insulation is aging, damp, or has any underlying defects. Catching these issues early is crucial for maintaining equipment integrity.
Test Instrument
The Intelligent Color Screen Dielectric Loss Tester is ideal for this. This instrument has a strong switching power supply. It creates pure sinusoidal waves at 45 Hz and 55 Hz. It automatically applies voltage, reaching up to 10 kV. It can also filter out 50 Hz interference on its own. This is especially useful for on-site testing in substations with strong electromagnetic interference.
Operating Procedure
First, turn off the CVT. Then, disconnect the high-voltage leads. Make sure the transformer is completely discharged; safety is paramount here.
Disconnect all output terminals from the CVT's secondary terminal box. Disconnect N from E. Ground the high-voltage terminal at the E terminal of the transformer.
Next, ground all 'n' terminals in the secondary box (1n, 2n, 3n). This grounding step improves measurement accuracy.
Once you verify all connections, power on the instrument. Select the CVT self-excitation measurement method. A test voltage of 0.5 kV is generally enough; never exceed 2.5 kV.
B. Turns Ratio Test

Test Purpose
The turns ratio test verifies if the CVT's voltage ratio meets specifications. It helps identify potential faults within the intermediate transformer windings. Any deviation can pose a serious internal issue.
Test Instrument
Use the same Intelligent Color Screen Dielectric Loss Tester for the test. Its versatility makes it a valuable tool for multiple diagnostic procedures.
Operating Procedure
Begin by de-energizing the CVT and disconnecting its high-voltage leads. A thorough discharge after de-energization is essential for safety.
Disconnect all output wiring terminals in the CVT's secondary terminal box: 1a1n, 2a2n, 3a3n, and dadn.
Then, short and ground the capacitor tail (N) and the high-voltage tail (E).
Proceed to short and ground all 'n' terminals (2n, 3n, dn) within the secondary terminal box. This setup isolates the relevant windings for precise measurement.
Connect the tester's ground first. Next, connect the instrument's high-voltage output to the CVT's high-voltage terminal, using a red dielectric loss cable. This is the end of the high-voltage lead. Connect the Cx terminal using a black signal cable. Clip the red clip to 1a and the black clip to 1n in the CVT secondary terminal box.
On the instrument, select the turns ratio test function. Set the output voltage to 10 kV and start the test.
C. Insulation Resistance Test
Test Purpose
This test checks if the CVT's insulation is wet, old, or has faults. It's a fundamental check for the health of the insulation system.
Test Instrument
A 2500V megohmmeter (insulation resistance tester) or an intelligent insulation resistance tester. These devices provide the necessary voltage and accuracy for reliable measurements.
Operating Procedure
a. First, de-energize the CVT and remove all external connections. Make sure the high-voltage terminal and secondary windings discharge completely; wait at least 3 minutes.
b. Connect the "E" terminal of the megohmmeter to ground, ensuring a secure connection. Connect the "L" terminal to the CVT's high-voltage terminal using insulated wire. Then, link each secondary winding (1a, 2a, 3a, da) one at a time.
c. Keep the "G" terminal suspended (if testing inter-winding insulation, ground the non-tested windings). Rotate the megohmmeter crank with a consistent motion (120 rpm). After the pointer stabilizes, record the insulation resistance value at the 1-minute mark.
d. Measure the insulation resistance in these steps: First, check the high-voltage terminal to ground. Next, test each secondary winding to ground. Finally, measure between the secondary windings.
Record all data and compare it with factory values or historical data. Generally, the insulation resistance value should be no less than 1,000 MΩ.
e. After testing, discharge the tested components again and disconnect all wiring.
D. Partial Discharge (PD) Test
Test Purpose
The PD test finds partial discharge signals in the CVT. These signals come from insulation defects, like gas bubbles or impurities. This helps identify early signs of insulation degradation; it's a critical test for proactive maintenance.
Test Instrument
You need these items: A partial discharge detector (50 kHz - 2 MHz), a coupling capacitor, and a high-voltage test transformer. This setup allows for the accurate detection of subtle discharge activity.
Operating Procedure
De-energize and discharge the CVT. Wipe off dust and oil from the high-voltage terminal and the secondary terminal box. A clean surface is essential for accurate readings.
Attach one end of the coupling capacitor to the output of the high-voltage test transformer, using a parallel connection method. Connect the other end of the coupling capacitor to the CVT's high-voltage terminal. Also, connect it to the "high-voltage input" of the partial discharge detector. Ensure the detector's "ground" terminal shares a common ground with the CVT.
Short and ground the secondary windings to prevent the introduction of interference signals. This isolation improves test accuracy.
Increase the test voltage gradually. Aim for 80% of 1.1 times the rated voltage. For example, if the rated voltage is 35 kV, raise it to 30.8 kV. Maintain this voltage for 1 minute and observe the partial discharge level. If the discharge level exceeds 10 pC, it warrants close attention.
Raise the voltage to 1.1 times the rated level. Hold it for 1 minute. Then, record the greatest discharge level, which should remain below a threshold of 50 pC. After testing, lower the voltage to 0.8 times the rated value. Check for any abnormal discharge fluctuations. If everything is normal, disconnect the power and discharge the unit.
E. Capacitance Measurement
Test Purpose
This test checks the total capacitance of the CVT's capacitive divider. It also measures the capacitance of each dividing capacitor (C1, C2). This checks if the capacitor parts are shorted, worn out, or have unusual capacitance changes.
Test Instrument
A capacitance bridge or a dielectric loss tester with capacitance measurement capabilities. These instruments provide precise readings for accurate assessment.
Operating Procedure
First, turn off the power and discharge the unit. Then, take out all the wiring from the CVT's secondary terminal box. Ground the high-voltage tail (E) of the intermediate transformer. Leave the capacitor tail (N) open.
Connect the "Cx" terminal of the dielectric loss tester to the high-voltage terminal of the CVT. Connect the "ground" terminal to the E terminal. Select "Capacitance Measurement" mode and set the test voltage to 1 kV.
Start the instrument and measure the total capacitance value (C1 + C2). Record this data with precision.
Reconnect the circuit: Connect the "Cx" terminal to the capacitor tail (N). Leave the high-voltage terminal open. Re-measure the capacitance value of the dividing capacitor C2. Calculate C1 by subtracting C2 from the total capacitance (C1 = Total Capacitance - C2).
Compare the measured values with the factory specifications. The deviation should not exceed ±5%; otherwise, it is an abnormality.
F. No-Load Loss and Load Loss Test

Test Purpose
These tests check how the CVT's intermediate transformer core and windings lose power. They help identify defects such as core saturation or winding short circuits. Understanding these losses is crucial for operational efficiency.
Test Instrument
For a full analysis, you need three items: a transformer loss parameter tester, a voltage regulator, and a standard current transformer.
Operating Procedure
No-Load Loss Test
a. Disconnect the CVT's high-voltage terminal wiring. Connect only the 1a1n secondary winding to the tester. Keep all other windings open.
b. Apply the rated secondary voltage (e.g., 100V) to the 1a1n winding using a voltage regulator. The tester will measure the input power, which represents the no-load loss. Record the no-load current as well.
c. During the test, observe if the voltage waveform is distorted. A sudden increase in current might indicate a multi-point grounding fault in the core.
Load Loss Test
a. Apply rated voltage across the 1a1n winding terminals. Connect a rated load (e.g., 50 VA, cosφ = 0.8) to the secondary side via a load box.
b. Use a standard current transformer to measure the secondary current. The tester will record the input power. Subtract the no-load loss to get the load loss.
c. Compare the measured value with the design value. If the deviation is over 10%, we need to check for winding short circuits or bad contacts.
G. Voltage Ratio Error and Phase Angle Difference Test
Test Purpose
This test checks the CVT's voltage ratio error and phase angle difference. It does this under different load and power factor conditions. It evaluates if its metering or protection accuracy meets requirements; this is crucial for precise system operation.
Test Instrument
A transformer calibrator, a voltage booster, and a standard voltage transformer are key for accurate comparisons.
Operating Procedure
Connect the CVT's high-voltage terminal to the voltage booster's output. Connect the standard voltage transformer in parallel with the CVT's high-voltage terminal. Next, link the secondary sides to the "tested" and "standard" terminals on the transformer calibrator.
In the secondary terminal box, connect only the 1a1n winding to the calibrator. Short and ground all other windings.
Slowly raise the voltage to 0.2, 0.5, 1.0, and 1.1 times the rated voltage. At each voltage level, check the ratio error and phase angle difference. Do this for different power factors: cosφ = 1.0, 0.8 lagging, and 0.8 leading.
The ratio error should not exceed ±0.5% (metering class) or ±1.0% (protection class). The phase angle difference should not exceed ±20' (metering class) or ±40' (protection class). If these limits are exceeded, troubleshoot for potential faults.
H. Sealing Test
Test Purpose
For oil-immersed CVTs, this test detects oil leakage and verifies sealing performance. This stops moisture and dirt from getting into the unit. These can cause significant damage to the insulation.
Test Instrument
You can use a pressure gauge, soapy water, or a helium mass spectrometer leak detector. It all depends on how precise you need to be.
Operating Procedure
a. For CVTs with oil valves, close the drain valve. Connect a pressure gauge to the oil valve. Then, fill the interior with dry nitrogen. Raise the pressure to 0.1 MPa.
b. Maintain the pressure for 30 minutes. Observe the pressure gauge reading. Engineers find a pressure drop acceptable if it stays below 0.01 MPa.
c. Apply soapy water to all sealing surfaces (flanges, porcelain bushing bases, valve connections). If no bubbles appear, confirm there is no leakage. If bubbles are present, mark the leak point for sealing repair.
d. For fully sealed structures, a helium mass spectrometer leak detector can be used. Apply helium gas to suspicious areas; an alarm on the detector indicates micro-leakage.
I. Infrared Thermal Imaging Detection

Test Purpose
This test uses an infrared thermal imager to find the temperature spread of the CVT while it runs. It helps find problems like bad contacts or overheating spots. This includes loose terminals and short circuits in internal windings.
Test Instrument
An infrared thermal imager is essential. It should have a resolution of at least 640×512. Also, it must measure temperature with an accuracy of ±2 ℃. High-resolution images are key for precise fault location.
Operating Procedure
Conduct the detection while the CVT is operating under rated load. Keep the ambient temperature steady. Avoid direct sunlight and strong air currents. These can affect readings.
Aim the thermal imager lens at the entire CVT from a distance of 3 to 5 meters. Capture a panoramic thermal image, recording the hottest points and overall temperature distribution.
Check the high-voltage connection terminals. Also, look at the secondary terminal box and the porcelain bushing surface. Shut down the unit if the local temperature is more than 10K different from the surroundings. Also, shut it down if the relative temperature difference exceeds 8%. This helps check for problems like loose terminals or internal short circuits.
Compare current thermal images with historical data. If the temperature rises a lot, even if it’s still below the limit, keep a close watch.
FAQ
The test voltage for dielectric loss is usually 0.5 kV and not more than 2.5 kV. Why?
The CVT's internal capacitive divider and transformer can only handle a certain voltage range. Testing at lower voltages reduces stress on the insulation. A voltage of 0.5 kV is enough to accurately show the dielectric loss characteristics. Exceeding 2.5 kV can harm older equipment. It may cause breakdowns at weak insulation points, raising the risk.
Before the turns ratio test, why are the 'n' terminals in the secondary terminal box shorted and grounded?
This is for safety. It prevents any voltage buildup that could affect the test results. It also protects the equipment from potential damage. Shorting and grounding the 'n' terminals stops stray currents and induced voltages in the secondary circuit. This ensures only the main winding (1a1n) is used in the turns ratio calculation. This boosts measurement accuracy and stops interference from signals of other windings.
How are the different test methods connected? How can I fully check CVT status?
Dielectric loss and capacitance tests primarily reflect insulation status. Turns ratio and error tests show how accurate the metering is. Also, partial discharge and infrared detection can find possible defects.
If dielectric loss is too high and capacitance is unusual, the capacitive divider insulation may be aging. If the turns ratio error is large and the no-load loss is high, it could point to an intermediate transformer winding fault. You need to combine data from various tests for a precise overall assessment.
What if there's significant electromagnetic interference during on-site dielectric loss testing?
You can use the Intelligent Color Screen Dielectric Loss Tester from this article. It has a built-in 50 Hz interference filtering function. Make sure to ground reliably. Keep test lead lengths short to avoid interference. If needed, test during low power load times. This helps reduce external electromagnetic effects.
If test results exceed the limits, is immediate CVT replacement always necessary?
Not necessarily. First, re-verify test connections and instrument functionality to rule out operational errors. If the deviation is confirmed, you might be able to fix minor defects. For example, you could replace seals or dry insulation. However, severe defects like capacitor breakdown or winding short circuits would require replacement. The action needed depends on how old the equipment is and what type of defect it has.

Conclusion
The stable operation of CVTs is paramount to power systems. These nine testing methods give thorough defect detection from different angles. They provide strong assurance for your equipment. Power engineers must follow test procedures closely. They should also prioritize safety at all times during operations.
[Field Case Study] We had a CVT with normal dielectric loss test results. However, infrared thermal imaging showed localized overheating at the high-voltage terminal. We found a loose connection bolt. Acting quickly stopped a bigger failure.
Weishoelec has strong ties to the power equipment sector. We offer CVT products that meet international standards. Our team provides expert technical support to clients in Europe, the Americas, and beyond. If you have questions about choosing equipment, running tests, or fixing faults, contact us anytime.
Phone: +86-0577-62788197
WhatsApp: +86 159 5777 0984
Email: [email protected]
We are dedicated to ensuring your power systems run smoothly. We offer reliable, made-in-China quality, and personalized services.
What challenges have you encountered during CVT testing? Share your experiences in the comments below. Let’s talk about them!